preloader
Color-Correction-service

PROFESSIONAL COLOR CORRECTION SERVICE

Photoshop color correction service

Are you tired of your photos looking bland and colorless? Do you want to bring out the beauty in your pictures without spending hours in the editing suite? Photoshop color correction service can help! Our experts can adjust the colors in your photos to give them a more vibrant look, making them look better than ever before.

What is image color correction?

Image color correction is the process of adjusting the colors in an image to make them look more accurate or consistent. An editor can do this for various reasons, such as making an image look more natural or fixing colors that have been incorrectly rendered. Image color correction can be performed on digital images, but it is also common to see color correction applied to film and video footage.

Color correction can be done in a few different ways, including changing the colors of individual pixels, adjusting the overall brightness and contrast of an image, or altering the colors displayed on the screen. You can use color correction to correct things like inaccurate skin tones, incorrect colors in clothing or scenery, and other inconsistencies within an image.

Color-Correction-for-shoe

Who needs color correction service?

The use of color correction in photography and videography is becoming more and more popular as people become more aware of the importance of matching colors correctly to create a pleasing image. Suppose you are shooting photos or videos in which people will be visible. In that case, it is important to have color correction services done on your footage so that your images look accurate and professional. This can help you avoid having to re-shoot scenes or edit out incorrect colors later on in post-production.

Types of photoshop color correction service

Color-Correction-for-skin-color-change

Model photography color correction

Model photography is a popular and often lucrative form of photography. However, color correction can be a challenge for model photographers because the colors in their images may not match the colors in reality. 

Color-Correction-for-jacket

Product photography color correction

Not all products look good in black and white, but they can look great in color. This is especially true when the product is used in conjunction with a colorful background. To ensure your product photos look their best,

Color-Correction-for-wedding

Wedding photography color correction

Wedding photography is a beautiful tradition that can be made even more special with perfect color correction. Whether your photos are from an outdoor wedding or a ceremony at a church, ensuring accurate color can help

Photo-Retouching-Service-for-portrait

Black and white photography colorization

Colorization is adding color to black and white photography. The results are often striking, providing a new and different perspective on old images. An editor uses this process to change the mood or atmosphere of a photograph or add a touch of humor.

Color-Correction-for-natural

Natural photo color correction

Natural photo color correction can be a great way to brighten and soften your images without using harsh filters. By using complementary colors, we can create a more natural-looking image that is more accurate to the original scene.

How it works

How The Clipping Path Services Works

01 . Place Work Order

Place your order from the order page

04 . download image

If there are any problems, please let us know. We will get back to you as soon as we can.

02 . quick response

We will be back within 30 minutes with the order confirmation email.

05 . made payment

If you are satisfied with the editing quality then send us your payment.

03 . image files

We will edit your images according to your requirements.

06 . give us review

Write us your opinion about the working experience with us.

Why you choose the clipping path services for color correction

Clipping path services company offers color correction service that is second to none. We use the latest technology to correct color flaws in photos and videos. Our team of experts is skilled in correcting colors for digital and print projects. We go above and beyond to make sure your photos and videos look their best. If you’re looking for a top-notch color correction service, look no further than Clipping Path Services Company.

  • The pricing is much more affordable. We start our base pricing at $.49 for each image.
  • You will get a big discount for bulk color correction services. Our discount prices vary, but it could be up to 40% on our editing service. 
  • You will get edited images in next day. We almost deliver projects within 24 hours. In addition, we can deliver 2000+ edited images each day.
  • 100% satisfaction guaranteed service will help to boost your business. We maintain quality strictly. Our production manager will re-check each image before delivering. If any mistake occurs, we are liable to fix it without any extra charge.
  • Two free trial images will help you to judge our work efficiency before placing any order. We offer each new client two free trial images. 
  • We value each client equally. It means; we take order for a single image to a large volume of images.
Have any question

Frequently Asked Questions

Do you provide a manual clipping path service?

Of course, we provide 100% manual photo clipping service. Our team uses photoshop pen tool for clipping paths.

What you need to get started for my project?

Firstly please send us your images with a common file format (JPG, PNG, TIF, etc.... ) A decent quality image will give you a great result. it's a request to give always a better quality image to get better results. But if you have low-quality images I also work on them.

Tell me your daily ability to clip path?

We can deliver 2000+ images in a single day.

How can I share the file with you?

You can use FTP, wetransfer and dropbox to share the file with us.  

Do you support various file formats?

Yes, we support jpeg, jpg, png, and tiff formats for image clipping service.

How We Create Clipping path in Photoshop

We will describe how to make a clipping path in photoshop.


Step 1: Open image in Photoshop

At first, Select the image you want to create a clipping path. Then, open it in adobe photoshop. You may use any versions of this software like adobe photoshop cs5, cs6, or cc version. In our cases, I am using adobe photoshop cc.

After opening the program, you can drag the image into the editing panel. However, you may also open the image using the menu. While clicking the menu, you will find an open button in the drop-down menu. Then, click on it, and it will allow you to open the image from your device.

You can also open the image by pressing the keyboard shortcut key "Ctrl+O. Use whatever you like; open the image in photoshop.


Step 2; Unlock the image in the panel.

Whenever you open an image in photoshop, it will be locked in the layer panel by default. However, you need to unlock it. Go to layer panel. Double click on the image layer, a new pop-up will open; click on the okay button. Your image will be unlocked.


Step 3: Zoom in

In this step, you need to zoom in on your image. Depending on image resolution, zoom percentage may vary from image to image. However, 300% is the standard zoom-in for creating a clipping path. You need to see the image edge clearly and draw an outline without decay any edge.


That's why we suggest zoom in before starting to outline. To do this, go to the top menu bar; from here, select the windows menu. While clicking on the windows menu, you will find the navigator menu at the drop-down menu. From here, you can zoom in and zoom out your image.

Want to use a shortcut way? Okay, press the keyboard key Ctrl+ for zoom in and Ctrl- for zoom out any image.


Step 4: Create A New Path layer

It is time to create a new path layer. Go to the layer panel below; you will find an option to create a new layer. Click on it; a new layer will be created. 

Remember, you need to select your existing path layer before creating a new layer.


Step 5: Select pen tool

The Photoshop pen tool is the main weapon to draw vector paths. So, you need to select the pen tool from the left side tool panel. You can use the keyboard shortcut key "P" to select the pen tool.


Step 6: Draw outline

Now, it is time to outline. After selecting the pen tool, place your first anchor point at the edge. Be careful while outlining. You may start drawing one pixel inside the image. It will help you to avoid any mistakes. However, never outline edge level. Always try to keep one or two pixels inside the image.


Step 6: Use the Hand tool

While you start outlining, you need to move the image to complete the drawings. But, how can you do this? In these cases, you can use the Hand tool. It will enable you to move your image. If you use a hand tool for moving, after completing this task, again, you need to select the pen tool for drawing the path.

However, you can do it in an easy process using the keyboard's space bar. Yes, with the space bar, you can move your image. Hold on to the spacebar and drag the image with the mouse. Your Photoshop pen tool will be selected. It will make your works more flexible.


Step 7: Complete drawing outline

Now, your task is very easy. You can select image edges correctly, moves the image without any hesitation. So, complete your drawing soon.

After joining the first anchor point with the last anchor point, you need to zoom out the photo. It will enable you to see how your drawing works.

Remember, you need to keep your image back in its original size to see it. For this, go to the top menu bar. From here, select view, and you will see some drop-down menus in here. Finally, select fit on the layer from here. Your image will be back in its original size.

However, you can do it with photoshop's shortcut key also. For doing this, press Ctrl+O from the keyboard. Your image will be back in its original size.


Step 8: Use selection and feathers correctly.

While you find everything is perfect. You need to use selection and feathers correctly for removal background. After selecting path 1, click on the mouse's right button, and from here, click on the selection. A new pop-up box will show in front of you, asking feather radius. Keep it 0.5, and click on the okay button.  


Step 9: Duplicate the Background

Great, you are almost done. For background removal, you need to duplicate the background. Go to the top menu bar, click on the layer. From the drop-down menu, click on the duplicate layer.

Of course, you can do it with the photoshop shortcut key. For doing this, press Ctrl+j from the keyboard. Your background will be duplicated.


Step 10: Add layer mask

Adding a layer mask is extremely important while you remove the original background from an image. Unless you add a layer mask, your original background will be deleted. And, it would be possible to back it. So, at this stage, we will add a layer mask to the image. See the screenshot below.


Step 11: Delete the Background Layer

Now, everything is perfect. We keep an original background copy. So, delete the background layer now. 


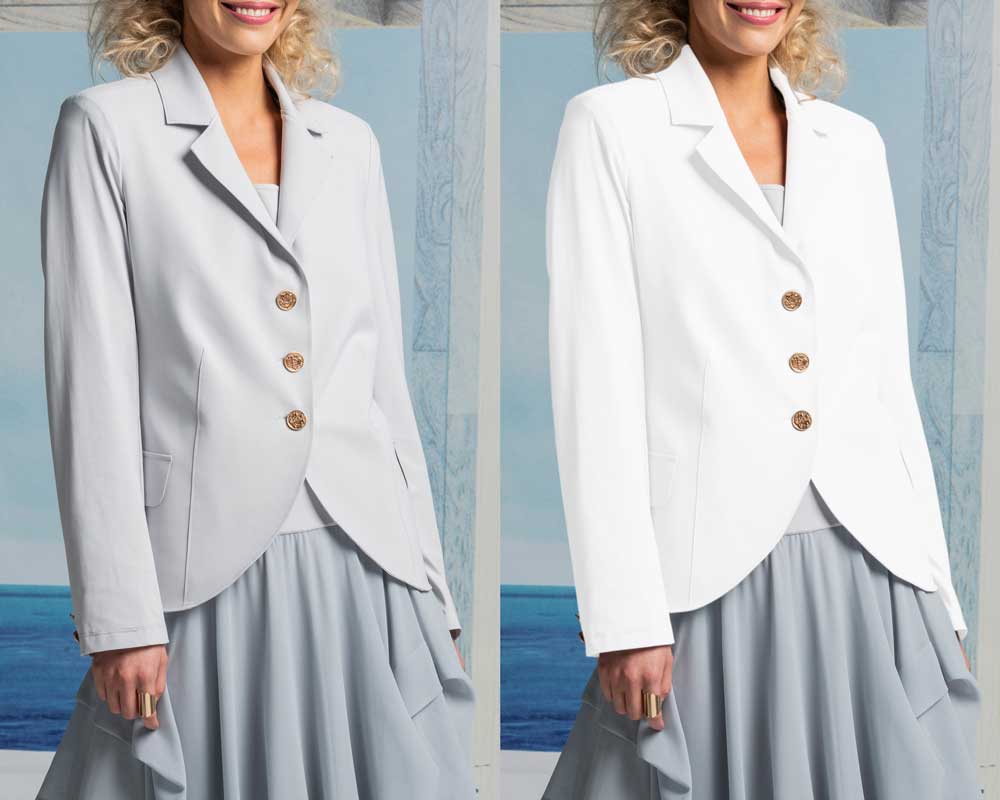
Look at the image; it is complete background less. You can add new background. From our experience in eCommerce product photo editing, adding white background is perfect for products. However, depending on your uses, you may use whatever you want.


Step 12: Save File

Finally, we completed our task. Now, it is time to save the file. You may save it in PSD, PNG, or JPEG file format. However, in our cases, I am keeping it in PSD file format. Whatever format you want, first of all, click on the File menu button. From the drop-down menu, select save as. Again a new box will ask you to select a file format from their file format templates. Select anyone from this and click on save.

Your image will be saved on your computer.

Try It For Free. Send Your Sample Images To Get Started